Is Your Computer Battery Dead? How to Fix and Replace Your CMOS Battery

If you’ve been using your computer for a while, you may have experienced a dead battery at some point. The battery that powers the CMOS (Complementary Metal-Oxide-Semiconductor) chip on your computer’s motherboard can die over time. This chip stores information about your computer’s hardware configuration, including the date and time. If your battery dies, this information can be lost, causing your computer to display incorrect date and time or not start at all.
Here’s how you can fix your CMOS battery and replace it if needed.
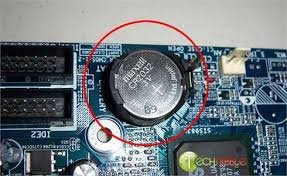
Identify Your CMOS Battery Location
The first step in fixing or replacing your CMOS battery is to locate it on your motherboard. Typically, the battery is a small, silver circular-shaped object, similar to a watch battery. The battery may be located near the edge of the motherboard or close to the center, depending on the computer’s model.
Fix a Dead CMOS Battery
your CMOS battery is dead, there’s a simple fix. First, unplug your computer from the power source and remove the battery from your motherboard. Wait for about 10 minutes, and then put the battery back in. This should reset your CMOS and allow it to regain functionality. After doing this, you’ll need to set the correct date and time in your computer’s BIOS (Basic Input/Output System).
Replace Your CMOS Battery
If your CMOS battery is too old or damaged, you’ll need to replace it. To do this, follow these simple steps.
1. Turn off your computer and unplug it from the power source.
2. Locate your CMOS battery and remove it carefully, using a small flathead screwdriver or your fingers.
3. Take note of the type of battery you’re removing as this information will be important when buying a replacement.
4. Purchase a new CMOS battery, ensuring that it matches the type and specifications of the old one.
5. Insert the new battery into the battery holder in the same way as the old one was removed.
6. Close your computer case, plug in the power and start your computer.
7. Enter the BIOS and set the date and time.


