How to Connect Your Android Device to Wi-Fi

Connecting your Android device to Wi-Fi can be a very simple process if you follow a few basic steps. Wi-Fi is a method of wireless communication that allows your Android device to connect to the internet without the use of cellular data. The following steps will guide you on how to connect your Android device to Wi-Fi.
Step 1: Go to Settings
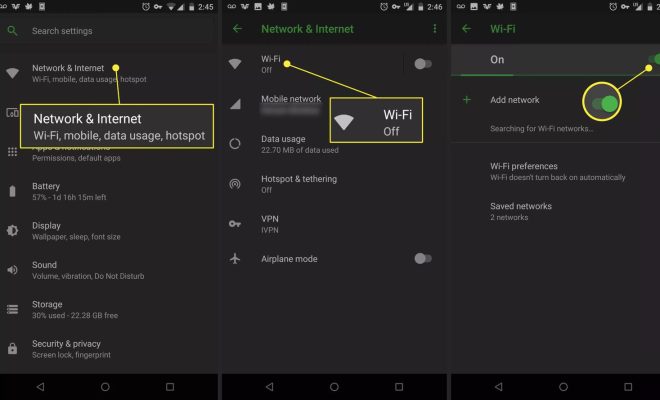
On your Android device, navigate to the “Settings” menu. This can be done by tapping on the cog icon in the app drawer or by sliding down the notification shade and accessing the settings menu from there.
Step 2: Tap on Wi-Fi
In the Settings menu, look for the option titled “Wi-Fi”. Tap on this option to access the Wi-Fi settings screen.
Step 3: Turn on Wi-Fi
On the Wi-Fi settings screen, toggle the switch to turn on Wi-Fi. Your Android device will now search for available Wi-Fi networks.
Step 4: Select a Wi-Fi network
Once your device has finished searching for available Wi-Fi networks, a list of networks will be displayed. Tap on the name of the network you wish to connect to.
Step 5: Enter the Wi-Fi network password
If the Wi-Fi network you selected is secured, you will need to enter a password to connect. Type in the Wi-Fi network password and tap on “Connect”. If the password is correct, your device will connect to the Wi-Fi network.
Step 6: Wait for the connection to establish
Once your device has connected to the Wi-Fi network, it will display a message saying “Connected”. Wait a few seconds until the Wi-Fi symbol appears in the notification bar, indicating that your device is now connected to Wi-Fi.
In conclusion, connecting your Android device to Wi-Fi is a simple and straightforward process. By following the steps above, you can ensure that your device is connected to Wi-Fi and that you can enjoy faster internet speeds than what is provided by your cellular data plan.


