Easy Ways to Transfer Data to a New Mac Using Migration Assistant

Upgrading to a new Mac is an exciting experience, but transferring data from your old computer can be daunting. Fortunately, Apple provides the Migration Assistant tool to help simplify this process. In this article, we’ll go through easy ways to transfer data to a new Mac using Migration Assistant.
Before You Begin
Before you start transferring your data, ensure that your old Mac and new Mac are connected to the same Wi-Fi network, and ensure that your old Mac meets the requirements for Migration Assistant.
To access Migration Assistant on your new Mac, search for it in the Spotlight (the magnifying glass icon in the upper-right corner of the screen).
Transferring Data via Migration Assistant
1. Open Migration Assistant
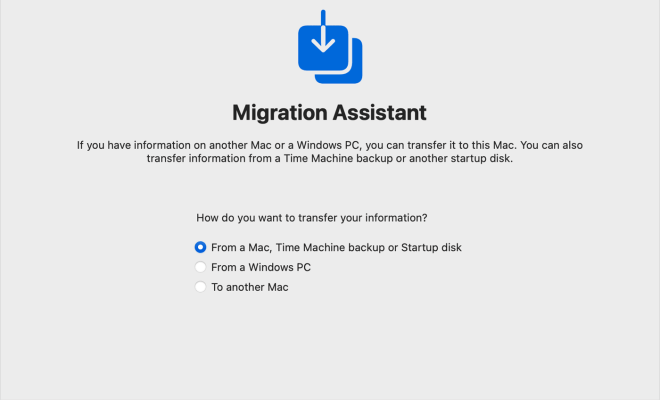
On your new Mac, open Migration Assistant, located in the Utilities folder in the Applications folder.
2. Choose a Transfer Method
Select the “From a Mac, Time Machine, or Startup Disk” option and click “Continue.”
3. Connect the 2 Macs
Connect your old Mac to your new Mac via a Thunderbolt, FireWire, or Ethernet cable. Alternatively, you can choose the Wi-Fi option if both computers are connected to the same Wi-Fi network.
4. Authenticate
When prompted, enter your old Mac’s administrator username and password and click “Continue.”
5. Choose What to Transfer
Select the types of data you want to transfer, such as documents, music, photos, and applications, and click “Continue.”
6. Wait for the Transfer to Complete
Once you’ve selected the data to transfer, click “Continue” to begin the process. The progress bar will show you the estimated time remaining. Wait for the process to complete.
7. Eject your Old Mac
Once the transfer is complete, Migration Assistant will prompt you to restart your new Mac. Afterward, safely disconnect your old Mac by dragging it to the Trash or using the “Eject” button in Finder.
Transfer Data Wirelessly
If you prefer to transfer data wirelessly, follow these steps:
1. Prepare your Old Mac
Open Migration Assistant on your old Mac.
2. Choose a Transfer Method
Select the “To another Mac” option and click “Continue.”
3. Authenticate
Enter your old Mac’s administrator username and password.
4. Select “Wireless Transfer”
Choose “Wireless Network” as the transfer method.
5. Wait for the Code to Appear
Wait for the security code to appear on your old Mac.
6. Connect to Wi-Fi
Connect your new Mac to the same Wi-Fi network as your old Mac.
7. Enter the Security Code
On your new Mac, open Migration Assistant and select the “From a Mac, Time Machine, or Startup Disk” option. Enter the security code displayed on your old Mac.
8. Choose the Data to Transfer
Select what data you want to transfer and click “Continue.”
9. Wait for Transfer to Complete
Once the process begins, wait for the transfer to complete.
In conclusion, transferring data to a new Mac using Migration Assistant is a straightforward process; you only need to follow the above easy steps. So, whether you’re upgrading to a new Mac or replacing your old one, Migration Assistant can help you transfer your data with ease. And that’s it! Congratulations – you’ve successfully transferred your data to your new Mac.


