5 Tips to Capture Screenshot the Right Way on Windows

Capturing a screenshot on Windows is an essential tool that can be used for several reasons, including capturing an error message to troubleshoot a computer problem, capturing an image of a website, or recording an important document. However, capturing a screenshot the right way can be challenging, especially for Windows users. In this article, we will provide you with five tips on how to capture a screenshot the right way on Windows.
1. Understand the Windows Screenshot Shortcuts:
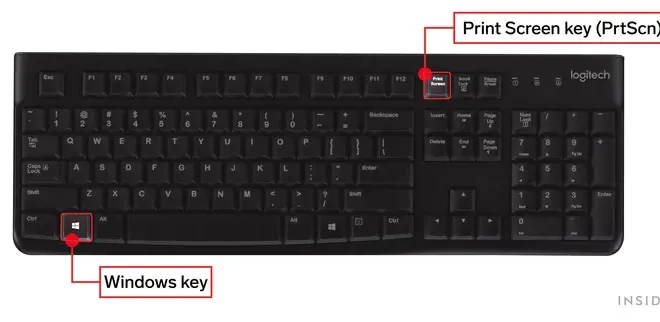
Knowing the keyboard shortcuts for taking screenshots is essential. The most common ones are Windows Key + Print Screen or Alt + Print Screen. You can use the Windows Key shortcut to capture the entire screen while the Alt + Print Screen option only captures the active window. Both shortcuts save the screenshot automatically in the default screenshot folder in your Windows files.
2. Use Snipping Tool:
Snipping tool is another built-in screenshot tool that is available for Windows. It has more features than the Print Screen tool, including screenshot annotations and customizability. To use Snipping tool, go to the Windows search bar and search for the tool. Once you open the tool, you can click on “New” to start taking a screenshot.
3. Customize Your Screenshot:
Windows offers additional options to customize your screenshot. You can take a screenshot of a specific window, rectangular, free-form or full-screen. You can also choose where the screenshot should be saved, or whether to save it to the clipboard to paste in a document later. To customize your screenshot, select the Print Screen or Alt + Print Screen option and use the snipping tool.
4. Save your Screenshots Correctly:
Once you take a screenshot, it will be saved to your default screenshot folder in Windows files. However, there is an option to change where the screenshots should be saved. To do this, open the Snipping tool or the Paint app and click on “File” then “Save As.” Choose the file format and the location in which you want to save your screenshot.
5. Use Third-Party Screenshot Tools:
If you’re looking for more advanced features than the Windows screenshot tools, you can use third-party tools like LightShot, Greenshot, or Snagit. These tools offer more advanced features like cropping, image editing, and capturing specific screen areas. You can download these tools online for free.
In conclusion, capturing a screenshot on Windows does not have to be a daunting task. With the tips outlined in this article, you can become an expert at capturing screenshots in Windows. Remember to use the right keyboard shortcuts, understand the customization options, save your screenshots correctly, and consider using third-party tools for more advanced features.


