The Quickest Way to Transfer Your Nintendo Switch Data and Account
As a Nintendo Switch owner, you may find yourself in a situation where you need to transfer your data and account to a new device. Maybe you’ve just bought a new console or perhaps your old one is showing signs of wear and tear. Whatever the reason, knowing the quickest way to transfer your Nintendo Switch data and account will save you time and get you back in the game faster. In this article, we’ll show you how it’s done.
Step 1: Prepare Your Consoles
Before beginning the transfer process, ensure both your old and new Nintendo Switch systems are fully charged or connected to their power supplies. Additionally, both consoles must be running on system version 4.0.0 or higher.
Step 2: Sign into Your Nintendo Account
On your new system, access the System Settings from the home screen and navigate to “Users,” now select “Add Friend” then choose “Sign in” using your existing Nintendo Account credentials (email address, password). You will be asked if you’d like to link your account with the new device; confirm by selecting “Link.”
Step 3: Initiate the Transfer Process
On your old console, go to System Settings, then scroll down to “Users” and select “Transfer Your User Data.” Read through the information provided on-screen and confirm that you want to proceed with the data transfer.
Step 4: Confirm Your New Console’s Registration
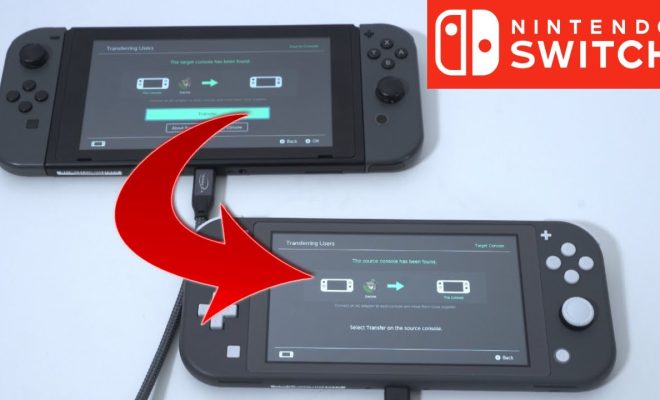
Returning to your new Nintendo Switch, follow the on-screen prompts for finding available consoles nearby. Once detected, your old console should appear on-screen; select it to continue. To ensure a secure connection between devices, you’ll be prompted with a unique passcode; confirm that both consoles show this code before pressing “A” simultaneously on each system.
Step 5: Begin Data Transfer
With the consoles paired successfully, you can now begin the data transfer process. Select “Transfer” on the old console and watch as your data is transferred to the new system. This step may take some time, depending on the size of your data. During the transfer, your old console will be reset to factory settings, and all associated profiles, save data, and digital games will be removed.
Step 6: Complete the Transfer
Once the transfer reaches 100% completion, you’ll see a notification on both consoles stating that it’s finished successfully. At this point, you can power off your old Nintendo Switch.
Step 7: Enjoy Your New System
Your new Nintendo Switch should now carry over all user accounts, profiles, save data, and game licenses. You can start playing right away!
Final Thoughts
Transferring your Nintendo Switch data and account is a simple process that can be completed in just seven steps. Be sure to update both consoles to their latest versions and follow each step carefully for a quick, hassle-free experience. Get back to gaming in no time with your new Nintendo Switch!