Monitor your data usage in Windows 10

Introduction
In today’s world of technology, we rely heavily on the internet for both work and entertainment. And with many data plans restricting the amount of data one can consume, it’s crucial to keep an eye on your usage. Fortunately, Windows 10 comes with built-in tools that can help you monitor and manage your data usage effectively. This article will walk you through the steps to track and control your data consumption in Windows 10.
Step 1: Accessing the Data Usage Menu
1. Click on the “Start” button in the bottom left corner of your screen or press the Windows key on your keyboard.
2. Open “Settings” by clicking on the gear icon above the power icon.
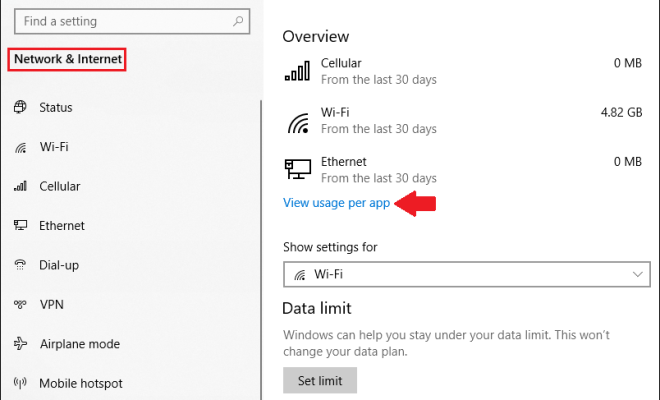
3. Select “Network & Internet” from the available options.
4. Click on “Data usage” in the left-hand panel.
Now you should see a page displaying an overview of your data usage over the past month, excluding roaming data.
Step 2: Understanding Your Data Usage
The Data Usage menu shows how much data has been consumed by different apps and features on your computer. You can also see which types of connections (Wi-Fi or Ethernet) have used the most data.
Take note of any unusually high data consumption by specific applications or processes. If you don’t recognize them, it’s worth investigating further to ensure there are no hidden issues or malicious programs running in the background.
Step 3: Setting a Data Limit
Windows 10 allows you to set limits for your data usage to help prevent exceeding your monthly allowance. Follow these steps to set up a limit:
1. Click on “Set limit” below the data usage graph.
2. Choose a type of limit for your connection (monthly, one-time, or unlimited).
3. Fill out the required fields based on your desired limit settings (e.g., reset date, data limit, and any additional reminders).
4. Click “Save” to apply the limit.
Now your system will provide you with notifications if you’re approaching your set data limit.
Step 4: Restrict Background Data Usage
Some applications use data in the background without explicit confirmation, leading to higher data consumption. To restrict background data usage:
1. Navigate to “Settings” > “Network & Internet” > “Data usage”.
2. Click on “Background data” below the data usage graph.
3. Toggle the switch to “Always” or “Never” depending on your preference for background data usage.
By disallowing background data usage, some apps may not function correctly or receive the latest information until you actively open them.
Conclusion
Monitoring your data usage in Windows 10 is a wise and practical solution to avoid unexpected overage charges, especially if you rely on a limited plan. By following the steps outlined in this article, you can effectively manage and control your internet consumption while staying within your plan’s limits.


