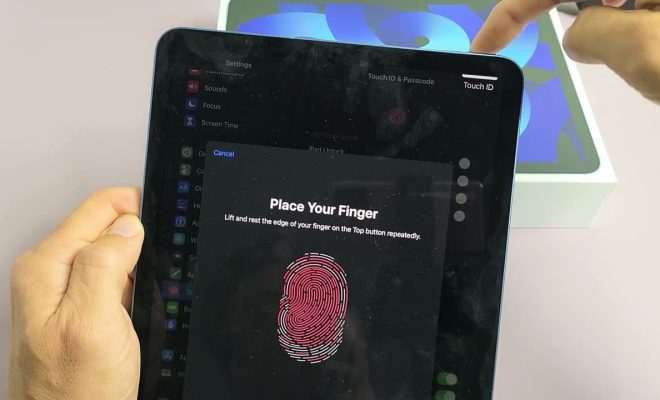
iPad Air: How to set up and use Apple’s new Touch ID fingerprint sensor

Apple’s iPad Air has gained an exciting new feature – the Touch ID fingerprint sensor. The Touch ID sensor allows users to unlock their device and make secure payments with just a touch of a finger. This article will walk you through setting up and using the Touch ID feature on your iPad Air.
Setting Up Touch ID on Your iPad Air
1. Turn on your iPad Air, if it is not already on, and locate the Touch ID button at the top-right corner of the device.
2. Go to the Settings app on your iPad Air and tap “Touch ID & Passcode” from the list of options.
3. You will be prompted to enter your device passcode. If you haven’t set up a passcode yet, do so now by following the on-screen instructions.
4. Once you’ve entered your passcode, tap “Add a Fingerprint” to set up your first fingerprint for Touch ID.
5. Place your finger (usually thumb or index finger) on the Touch ID button, ensuring that the entire surface of your finger covers the button.
6. As soon as you feel a slight vibration, lift your finger and place it back down again, slightly shifting its position each time to ensure that all parts of your fingerprint are captured.
7. Once the capturing process is complete, you will be prompted to adjust your grip to capture the edges of your fingerprint. Repeat step 6 for capturing the edges of your fingerprint.
8. When you have successfully completed the setup process, tap “Continue” to proceed. You can add additional fingerprints by tapping “Add Another Fingerprint” and following steps 5-7 again.
How to Use Touch ID
1. Unlocking Your iPad Air: To unlock your iPad using Touch ID, simply press down on the Touch ID button with a registered finger when your device screen is turned on. You will feel a slight vibration, and your iPad Air will unlock immediately.
2. Secure Purchases: To utilize Touch ID for making App Store or iTunes purchases, go to Settings, and then tap “Touch ID & Passcode.” From there, toggle the switch on for both “iTunes & App Store” and “Apple Pay.” After you set this up, you can use your fingerprint to authenticate purchases from supported apps and websites.
3. Password Autofill: Touch ID also works with password auto-fill for apps and websites that support this feature. When prompted to enter a saved password, tap the password field to display a “Use Touch ID” prompt. Simply press down on the Touch ID button to authenticate.
4. Third-Party Apps: Many third-party apps now support Touch ID integration for added security. Check your favorite apps’ settings menus to see if they offer Touch ID authentication.
By setting up and using Apple’s new Touch ID fingerprint sensor on your iPad Air, you can enjoy added convenience and security in your daily interactions with your device. The future of device access is at your fingertips!


