How to Zip and Unzip Files and Folders on Mac

As a Mac user, you may need to compress or decompress files and folders for various reasons. Whether you want to save storage space, send files via email, or share with others, zipping and unzipping files and folders can come in handy. Fortunately, the Mac operating system comes with a built-in feature to zip and unzip files and folders without installing any third-party software. In this article, we’ll show you how to zip and unzip files and folders on Mac.
Zipping files and folders on Mac
Zipping files and folders on Mac is a straightforward process. Here’s what you need to do:
Step 1: Locate the files or folders you want to zip, and select them.
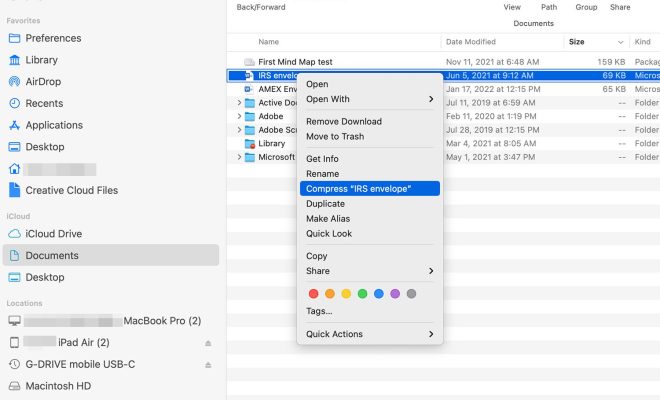
Step 2: Right-click on the selected files, and click on the “Compress [selected items]” option.
Alternatively, you can click on the “File” menu on the top left corner of the screen, and select the “Compress [selected items]” option.
Step 3: Wait for the Mac to create a .zip archive of the selected files or folders. Depending on the number and size of the files, this process may take a few seconds or minutes.
Step 4: Once the zipping process is complete, you’ll see a new .zip file with the same name as the selected files or folders.
Unzipping files and folders on Mac
Unzipping a file or folder on Mac is also a simple process. Here’s what you need to do:
Step 1: Locate the .zip archive you want to unzip, and select it.
Step 2: Right-click on the .zip file, and click on the “Open With” option.
Step 3: From the list of available apps, select “Archive Utility” or any other third-party app you may have installed for unzipping files.
Step 4: The Mac will automatically extract the contents of the .zip archive to a new folder with the same name as the .zip file.
Advanced options for zipping and unzipping files and folders
If you want to explore more advanced options for zipping and unzipping files and folders on Mac, here are a few things you can do:
• Change the file format: By default, the Mac creates a .zip file when you compress files or folders. However, you can change the file format to .tar, .tgz, .tbz, or .txz by clicking on the “Options” button in the compression window.
• Password-protect your archive: If you’re compressing sensitive files, you may want to password-protect your archive to prevent unauthorized access. To do this, click on the “Options” button in the compression window, and select the “Encrypt [archive name] with password” option.
• Split large files into smaller parts: If you’re dealing with large files, you may want to split them into smaller parts to make them easier to share or store. To do this, click on the “Options” button in the compression window, and select the “Split [archive name] into volumes” option.
Conclusion Zipping and unzipping files and folders on Mac is a simple and useful feature that can save you time and storage space. Whether you’re compressing files for email, sharing with others, or archiving old documents, the built-in tools on Mac are easy to use and offer advanced options to customize your archive. With these basic steps, you should be able to zip and unzip files like a pro on your Mac.


