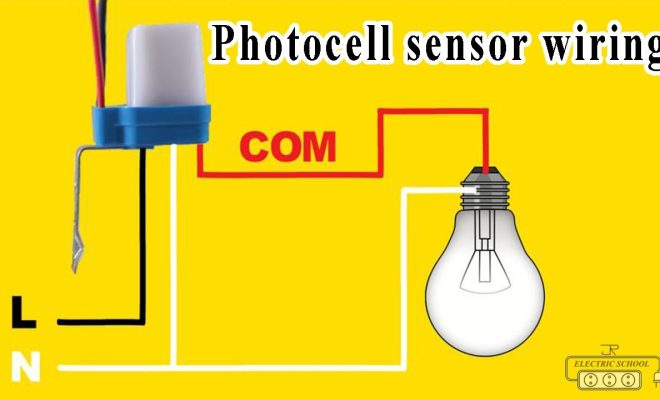
How to Wire a Photoelectric Switch

A photoelectric switch is a device that uses light to turn on or off an electrical circuit. This kind of switch is usually found in outdoor lighting fixtures, such as streetlights, parking lot lights, and floodlights. Wiring a photoelectric switch may seem daunting, but it’s actually a straightforward process that can be done with a few tools and a little bit of patience. In this article, we’ll show you how to wire a photoelectric switch in a few simple steps.
Step 1: Turn Off the Power
Before you start wiring the photoelectric switch, it’s essential to turn off the power to the circuit you’ll be working on. Locate the breaker or fuse that controls the circuit and switch it off. If you’re unsure which breaker or fuse to switch off, it’s best to turn off the power to your home or business.
Step 2: Choose a Location for the Photoelectric Switch
Decide the location for the photoelectric switch, typically near the light fixture it controls. Some light fixtures already have a photoelectric switch built into them, making the installation much more straightforward. In this case, skip to the next step. If not, pick a spot on the exterior of the building where the switch will be protected from water and other elements.
Step 3: Run Electrical Cable
Run electrical cable from the switch’s location to the light fixture’s electrical junction box. Typically, this involves using a drill to create a hole in the wall and snaking the cable through it.
Step 4: Connect the Wires
Strip the ends of the cables attached to the photoelectric switch according to the manufacturer’s instructions. Connect the black wire from the switch to the black wire from the light fixture, and connect the white wire from the switch to the white wire coming from the main supply.
Step 5: Secure the Wiring
Use wire nuts to secure the wiring connections. Make sure each wire nut is tight and snug, and wrap the connection with electrical tape once the wire nut is in place.
Step 6: Attach the Photoelectric Switch
Mount the photoelectric switch to the wall or electrical box using screws or other hardware provided with the switch. Ensure the switch is secured tightly to the wall or box.
Step 7: Turn On the Power
Turn the circuit breaker or fuse back on, and test the photoelectric switch. The light should turn on once it becomes dark and turn off during daylight hours. If everything works as expected, then the job is done! To conclude, wiring a photoelectric switch is simple and straightforward, as long as you follow instructions and take proper safety precautions. Always make sure the power is turned off before working on your electrical system, and use caution when handling electrical wires. By following the steps outlined above, you’ll be able to wire a photoelectric switch easily and create a more energy-efficient outdoor lighting system in no time


