How to Restart Print Spooler Service on Windows

I f you’ve ever experienced issues with your printer on a Windows computer, you may have heard of the Print Spooler Service. This service is responsible for managing print jobs and queuing them up for the printer to process. However, sometimes this service can become corrupted or stop working properly, resulting in printing errors. In this article, we’ll go through the steps on how to restart the Print Spooler Service on Windows.
Step 1: Stop the Print Spooler Service
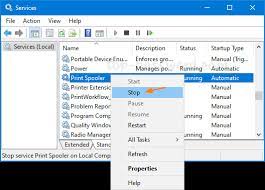
The first step in restarting the Print Spooler Service is to stop it. To do this, press the Windows key + R on your keyboard. This will open the Run dialog box. Type in “services.msc” and press Enter. This will open the Services window.
In the Services window, scroll down until you find “Print Spooler”. Right-click on it and select “Stop”.
Step 2: Clear the Print Spooler Files
Once the Print Spooler Service is stopped, the next step is to clear out the spooler files. To do this, open File Explorer and navigate to this folder:
C:\Windows\System32\spool\PRINTERS
Delete all files in this folder. This will clear out any print jobs that may be stuck in the queue.
Step 3: Restart the Print Spooler Service
After clearing out the spooler files, go back to the Services window and right-click on the “Print Spooler” service once again. This time, select “Start”.
The Print Spooler Service will start up again and should be fully functional. You can now try printing a test page to make sure everything is working as it should.
Conclusion
Restarting the Print Spooler Service is a simple process that can often fix printing issues on Windows computers. By following the above steps, you can easily stop the service, clear out the spooler files, and restart the service to get back to printing again.


