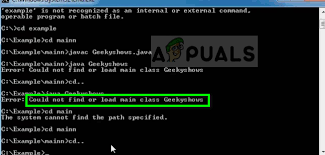
How to Reset Your Roku Remote
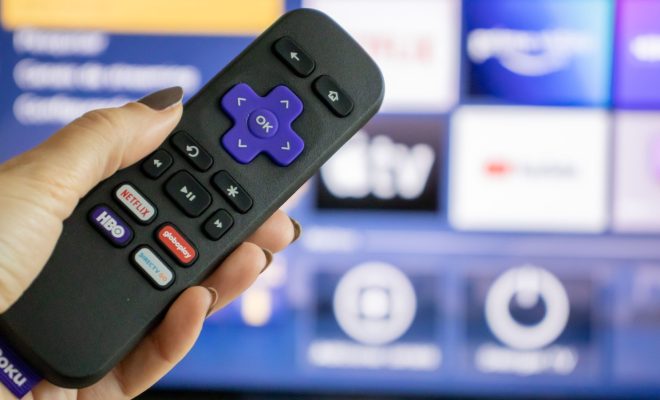
If you own a Roku device, you know how important the remote is. The remote allows you to navigate through your Roku channels, control the volume, and even turn your TV on and off. However, like any other device, your Roku remote may encounter issues. One common solution to fix the issues is by resetting the remote.
Here are some steps on how to reset your Roku remote:
Step 1: Remove the batteries
Locate the battery compartment on the backside of your Roku remote. Slide open the compartment and remove the batteries. Wait for a few seconds before reinserting the batteries back into the compartment. Doing so can help reset your remote’s connection with your Roku device.
Step 2: Power cycle your Roku
If the first step did not work, try power cycling your Roku device. Unplug your Roku device and wait for at least 10-15 seconds before plugging it back in. Wait for your Roku device to reboot before trying to pair your remote again.
Step 3: Pair your remote with your Roku
If you still encounter issues with your Roku remote, you may need to re-pair your remote with your Roku device. Here are the steps to follow:
– Press and hold the ‘pairing’ button located at the back of your remote. Hold the button for at least 3 seconds.
– Release the button once the pairing light starts to blink on the remote.
– Wait for the light to stop blinking and stay solidly lit. This means that the remote has successfully paired with your Roku device.
If none of these solutions work, it may be time to purchase a new remote. However, before doing so, check with Roku support to see if they can assist you further. They may be able to provide additional tips or offer a replacement remote if your current one is still under warranty.
In conclusion, resetting your Roku remote is simple and easy. By following the steps above, you can quickly fix any issues you may encounter with your remote and continue enjoying your Roku experience.