How to Remove Wallpaper – A Comprehensive Guide
Introduction:
Removing wallpaper can be a daunting task, but it doesn’t have to be. With the right tools and techniques, the entire process can be smooth and stress-free. In this article, we will discuss a step-by-step guide on how to remove wallpaper from your home.
Materials Needed:
– Drop cloths
– Plastic sheeting
– Painter’s tape
– Wallpaper scraper or a plastic putty knife
– Wallpaper scoring tool
– Wallpaper removal solution or homemade solution (warm water with dish soap)
– Spray bottle or paint roller
– Sponge and bucket of warm water
– Ladder (if needed)
Step 1: Prepare the Room
Remove all furniture or other items from the room and cover the floors with drop cloths for protection. Use plastic sheeting and painter’s tape to protect baseboards, electrical outlets, and any other areas you don’t want to damage during the removal process.
Step 2: Score the Wallpaper
Using a wallpaper scoring tool, create tiny punctures in the wallpaper surface without damaging the underlying wall. This will help the wallpaper removal solution penetrate more effectively.
Step 3: Apply Removal Solution
In a spray bottle or paint tray, mix a solution of warm water and dish soap or use a commercial wallpaper removal solution. Apply this solution generously onto the scored wallpaper using a spray bottle or paint roller. Allow it to soak into the wallpaper for about 15 minutes.
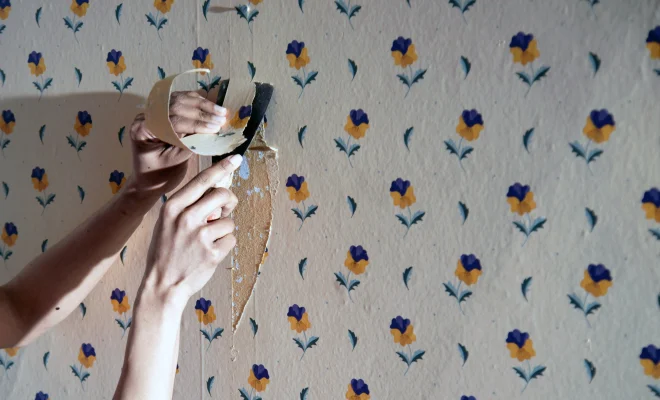
Step 4: Scrape Off Wallpaper
Starting at an edge or seam, gently pry up the soaked wallpaper with your scraper. If it doesn’t come off easily, reapply more solution and wait another few minutes before continuing. Work in small sections to avoid damage to the wall beneath.
Step 5: Clean Off Residual Adhesive
Once you have removed all wallpaper pieces, fill a bucket with warm water and use a sponge to gently wipe away any remaining adhesive residue. Be sure to rinse the sponge often to avoid spreading the adhesive further.
Step 6: Inspect and Repair Drywall
After the wallpaper has been removed and the walls have dried, examine the drywall for any damage such as gouges or nicks. Fill these imperfections with joint compound and sand them down until they are smooth and even.
Step 7: Prime and Paint
After all repairs have been made and your walls are clean and smooth, apply a primer to seal the surface of the wall. Once the primer has dried, you are ready to paint your freshly revealed wall in a color of your choice.
Conclusion:
Although wallpaper removal can be a tedious job, with proper preparation, tools, and technique, it can be successfully accomplished. Follow these steps to transform your walls from outdated prints to fresh modern designs.