How to Manage Disk Partitions in Linux With fdisk

Managing disk partitions in Linux is an essential skill that every system administrator should have. One of the most commonly used tools for managing disk partitions in Linux is fdisk. Fdisk is a command-line utility that can help you create, delete, and modify disk partitions in a Linux system.
In this article, we will discuss how to manage disk partitions in Linux with fdisk.
Step 1: Open Terminal
The first step in managing disk partitions in Linux is opening the Terminal. The Terminal is where you will run all the fdisk commands. You can open Terminal on most Linux distributions by pressing Ctrl+Alt+T.
Step 2: List partitions
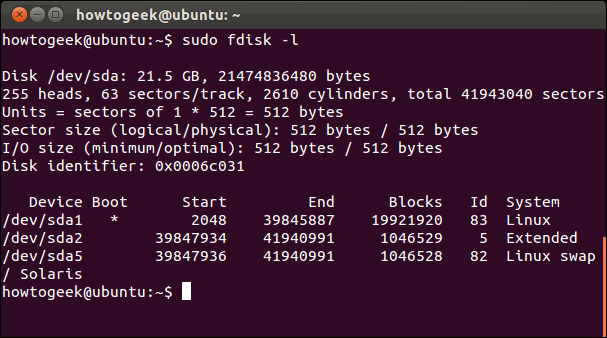
Before you can manage your disk partitions with fdisk, you need to know the current status of your partitions. You can use the fdisk command with the -l option to list all your disk partitions.
sudo fdisk -l
This command will list all the available disk partitions on your system. You can see the device name, partition number, size, and type of each partition.
Step 3: Select a disk
The next step is to select the disk you want to manage with fdisk. You must know the device name of the disk you want to manage. For example, if you want to manage the disk /dev/sda, you would use the following command:
sudo fdisk /dev/sda
Step 4: Create a partition
To create a new partition on the selected disk, use the following steps:
1. Press the “n” key.
2. Choose the type of partition to create. You can create primary or extended partitions. To create a primary partition, type “p.” To create an extended partition, type “e.”
3. Enter the partition number. The number can be any value between 1 and 4 for primary partitions and between 5 and 64 for extended partitions.
4. Enter the first sector of the partition. This is the starting point of the partition and can be any value between 1 and the end of the disk.
5. Enter the size of the partition. You can specify the size in sectors, cylinders, or megabytes.
6. Press the “w” key to write the changes to the disk.
Step 5: Delete a partition
To delete a partition, use the following steps:
1. Press the “d” key.
2. Enter the partition number you want to delete.
3. Press the “w” key to write the changes to the disk.
Step 6: Resize a partition
To resize a partition, you need to delete the existing partition and create a new one of the desired size. Follow the steps in Step 4 to create a new partition, specifying the new partition size.
Step 7: Save and exit
After making changes to your disk partitions, you need to save and exit fdisk. Press the “w” key to write the changes to the disk and quit fdisk.
Conclusion
Managing disk partitions in Linux with fdisk is a handy skill for any system administrator. It can help you create, delete, and modify disk partitions in a simple and intuitive way. Remember to always back up your data before making changes to your disk partitions.


