How to Lock Notes on iPhone

As our daily lives become more digitalized, we often find ourselves using our smartphones to store sensitive information like passwords, bank account numbers, and personal thoughts. With the Notes app on the iPhone, users can keep all of their information organized and easily accessible. However, some information may be too personal and we may not want others to have access to it. In this article, we’ll show you how to lock notes on your iPhone to keep your sensitive information private.
Step 1: Update your iPhone
Before you begin, make sure your iPhone is updated to the latest version of iOS. This ensures that you have access to all the latest security features.
Step 2: Use Touch ID or Face ID
If your iPhone has Touch ID or Face ID, you can use these features to lock your notes. To do this, go to Settings > Notes > Password, and turn on “Use Touch ID” or “Use Face ID.” You will then be prompted to enter your passcode.
Step 3: Set a Password
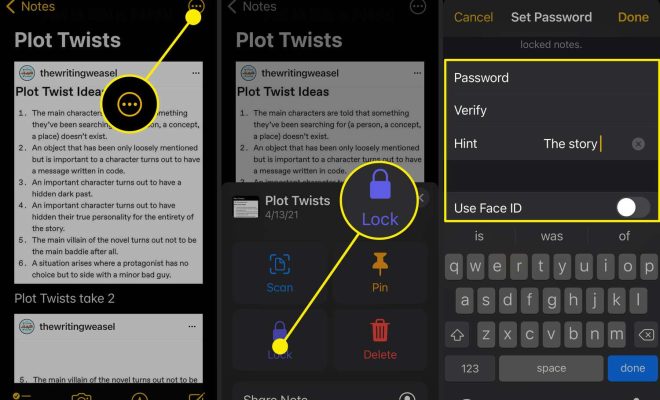
If your iPhone does not have Touch ID or Face ID or if you prefer to use a password, you can set a password for your notes. In the same menu as step 2, turn off “Use Touch ID” or “Use Face ID,” and select “Set Password.” You will then be prompted to enter a password.
Step 4: Lock individual notes
Once you’ve set a password, you can lock individual notes. To do this, open the Notes app and select the note you want to lock. Tap on the share icon in the top right corner, then select “Lock Note.” You will then be prompted to enter your password.
Step 5: Manage locked notes
To view and manage your locked notes, go to the Notes app and select “Locked Notes” from the folder list. From here, you can view and edit your locked notes, or lock and unlock notes as necessary.
By following these five simple steps, you can rest assured that your sensitive information is safe and private on your iPhone. With the Notes app’s built-in security features, you can easily manage your notes while keeping your personal information secure.


