How to Install and Use Neofetch on Linux

Neofetch is a command-line tool that displays system information on Linux. It is a popular tool among Linux users that presents the operating system’s information in a visually appealing way. Not only does it show the basic system information, but it can even display information on the current environment variables, software versions, and the system’s logo.
In this article, we’ll explore how to install and use Neofetch on your Linux system so that you can view essential information quickly and efficiently.
Installing Neofetch
Before we can use Neofetch, we need to install it since it does not come preinstalled on most distributions. Installing Neofetch is pretty easy, and it can be done using the package manager.
You can install Neofetch using the following command based on your distribution:
Ubuntu/Debian:
“`
sudo apt-get install neofetch
“`
RHEL/CentOS/Fedora:
“`
sudo dnf install neofetch
“`
OpenSUSE:
“`
sudo zypper install neofetch
“`
Arch Linux:
“`
sudo pacman -S neofetch
“`
Once it’s done, Neofetch is ready to use.
Using Neofetch
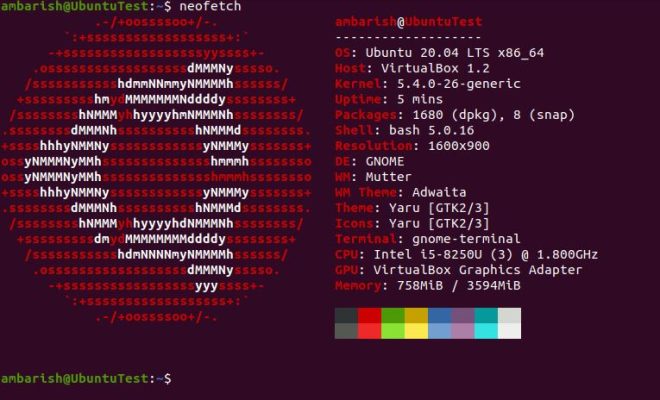
Using Neofetch is quite simple, as it only requires running one command in the Terminal. You can view the basic information about your system by typing the following command:
“`
neofetch
“`
This will show you information such as your Operating System, Kernel Version, Uptime, Memory Usage, and CPU usage, among other things. Additionally, it displays an ASCII art image of the Linux mascot, Tux (the penguin).
If you want to display information that is more specific, you can use the various options available in Neofetch. Here are some of the options that we can use along with Neofetch:
1. `–help`: This option will display a list of all available options in Neofetch.
2. `–ascii_distro`: It will display only the ASCII distro logo.
3. `–color_blocks`: It displays each component with a different color block.
4. `–kernel-shorthand`: Displays the kernel version in a shorter format.
5. `–off`: Disables all built-in info scripts and disables colors.
6. `– off_screen`: Disables colors and bolding, which is helpful if you’re using it in a non-graphical environment.
You can try out these options by running them along with the `neofetch` command. Here’s an example:
“`
neofetch –color_blocks –kernel-shorthand
“`
This will display the information using colors and the kernel version in a shorter format.
Customizing Neofetch
If you want to customize the way Neofetch looks, you can do so by modifying the configuration file. By default, Neofetch looks for the configuration file in the `~/.config/neofetch/config` directory. However, if you want to modify the configuration file, you can create it in the same location.
Here are some of the things you can customize using the configuration file:
1. Fonts
You can change the font used by Neofetch by modifying the font settings in the configuration file. Here’s an example configuration:
“`
# Set the font size and type
font_size=10
font_type=”ubuntu”
“`
2. Colors
Neofetch comes with several built-in color schemes that you can use. However, if you want to customize the color scheme, you can do so by modifying the color settings in the configuration file.
Here’s an example configuration:
“`
# Set the color scheme
color_1=”1;38;2;242;110;34;48;2;235;41;24″
color_2=”255;255;255″
color_3=”1;38;2;75;176;76;48;2;116;208;94″
color_4=”1;38;2;52;135;226;48;2;9;132;227″
“`
3. ASCII art
Neofetch also allows you to modify the ASCII art that is displayed when Neofetch is run. You can change the ASCII art by modifying the `ascii_distro` variable in the configuration file.
Here’s an example configuration:
“`
# Display specific ASCII art for your distro
ascii_distro=”ubuntu_small”
“`
Conclusion
Neofetch is a simple, yet elegant tool that displays system information in a visually appealing way. It is a great tool for anyone who wants to quickly view essential system information without having to navigate through menus. With the help of this guide, you can easily install Neofetch on your Linux system and start customizing it to your preferences.


