How to Enable TPM 2.0 for Windows 11
With the release of Windows 11, Microsoft has made Trusted Platform Module (TPM) 2.0 a mandatory requirement. This means in order to upgrade to Windows 11, your system must have TPM 2.0 enabled. TPM 2.0 is a hardware-based security feature that assists in the protection of your computer, particularly during boot-up and login sessions. This article will provide instructions on how to check if your system has TPM 2.0 enabled, and how to enable it if it is not already activated.
How to check if TPM 2.0 is enabled on your system
1. Press the Windows key + R to open the Run dialog box
2. Type “tpm.msc” and press Enter
3. In the TPM Management on Local Computer window, you will see a message that says “The TPM is ready for use.” This indicates that your system has TPM 2.0 enabled.
If the message says, “Compatible TPM cannot be found,” or “This device cannot use a Trusted Platform Module,” this means that your system does not have TPM 2.0 enabled, and you will need to enable it.
How to enable TPM 2.0 on your system
1. Restart your computer and enter the BIOS setup by pressing the appropriate key during startup (usually F2 or Delete).
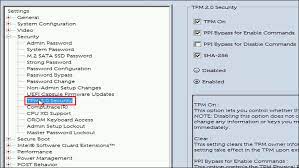
2. Look for the Security or Trusted Computing section in the BIOS setup.
3. Locate the TPM option and ensure it is enabled.
4. Save the changes and exit the BIOS setup.
5. Restart your computer, and follow the steps above to check if TPM 2.0 has been activated.
If your system doesn’t have a TPM 2.0 chip, you can either purchase a compatible hardware TPM 2.0 or utilize a virtual TPM to enable the feature.
In conclusion, TPM 2.0 is a powerful security feature that ensures the protection of your computer from unauthorized access. As such, it’s crucial to enable TPM 2.0 in your system before upgrading to Windows 11. The above steps should help guide you through the process smoothly.