How to Change Your DNS Settings to Increase Speed

The Domain Name System (DNS) is responsible for translating human-readable website addresses into their actual IP addresses, allowing us to access them on the internet. DNS servers can play a significant role in your internet speed, as they can affect how quickly your computer can connect to a website. If your current DNS server is not performing well, you might experience slow internet speeds and long loading times.
Fortunately, changing your DNS settings can be an easy way to improve your internet speed. This article will guide you through the steps to change your DNS settings on a computer running Windows 10.
Step 1: Open the Control Panel
Click on the “Start” button on your taskbar and type “Control Panel” in the search box. Open the Control Panel from the search results.
Step 2: Click on “Network and Sharing Center”
In the Control Panel window, click on “Network and Sharing Center”.
Step 3: Click on “Change adapter settings”
On the left side of the Network and Sharing Center window, click on “Change adapter settings”. This will show you a list of all the network connections available on your computer.
Step 4: Right-click on your network adapter
Right-click on the network adapter you are currently using to connect to the internet and select “Properties” from the drop-down menu.
Step 5: Select Internet Protocol Version 4 (TCP/IPv4)
In the Properties window, scroll down the list of items and select “Internet Protocol Version 4 (TCP/IPv4)”. Click on the “Properties” button.
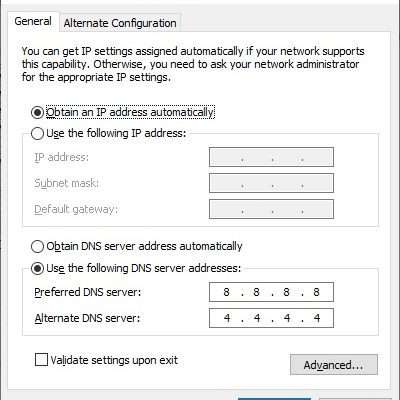
Step 6: Select “Use the following DNS server addresses”
In the Internet Protocol Version 4 (TCP/IPv4) Properties window, select “Use the following DNS server addresses”. Enter the following DNS addresses in the fields provided:
Preferred DNS server: 8.8.8.8
Alternate DNS server: 8.8.4.4
These addresses are Google’s public DNS servers, and they are known to provide fast and reliable connections.
Step 7: Click “OK”
Click on the “OK” button to save your changes.
Step 8: Test your internet speed
Now that you have changed your DNS settings, you can test your internet speed to see if it has improved. Visit any site that lets you check your internet speed, such as Speedtest.net or Fast.com, and measure your download and upload speeds. If you notice an improvement in your speed, you can be confident that your new DNS settings are working correctly.
Conclusion
Changing your DNS settings can significantly improve your internet speed and make your browsing experience more enjoyable. If you follow the steps outlined above, you can change your DNS settings in just a few minutes and start experiencing faster internet speeds. However, keep in mind that different DNS servers might work better for different users, so it’s worth experimenting with different options to find the best one for you.


