How to Block (and Allow) Microsoft Account Sign-Ins on Windows 10

Microsoft accounts are a convenient way to access various services offered by Microsoft, including Office 365, OneDrive, and the Windows Store. However, there may be situations where you want to restrict users from signing in with a Microsoft account on your Windows 10 computer. This article will guide you through the steps for blocking and allowing Microsoft account sign-ins on Windows 10.
Blocking Microsoft Account Sign-Ins on Windows 10
Step 1: Open the Local Group Policy Editor
Press the Windows key + R keyboard shortcut to open the Run dialog box. Type “gpedit.msc” (without quotes) and press Enter to open the Local Group Policy Editor.
Step 2: Navigate to the “Accounts: Block Microsoft Accounts” Policy
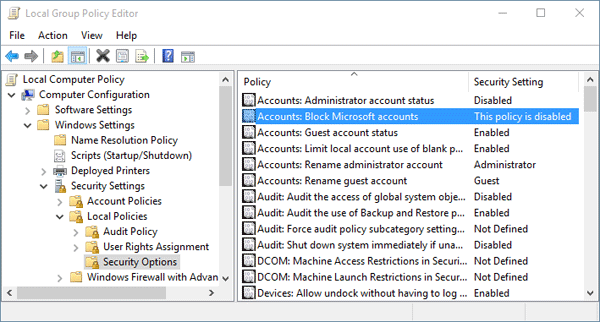
In the Local Group Policy Editor, navigate to Computer Configuration > Windows Settings > Security Settings > Local Policies > Security Options. Look for the “Accounts: Block Microsoft accounts” policy and double-click it to open its properties.
Step 3: Change the Policy Setting
To block Microsoft account sign-ins on Windows 10, change the policy setting to “Users can’t add Microsoft accounts.” Click the radio button next to this option and then click the “OK” button to save the changes.
Step 4: Verify the Policy Has Been Applied
Once you have saved the policy setting, restart your computer. After it restarts, try signing in with a Microsoft account. If everything is configured correctly, you should see a message that says, “Your organization doesn’t allow you to use a Microsoft account.”
Allowing Microsoft Account Sign-Ins on Windows 10
Step 1: Open the Local Group Policy Editor
Follow the same steps as outlined in the previous section to open the Local Group Policy Editor.
Step 2: Navigate to the “Accounts: Block Microsoft Accounts” Policy
Navigate to Computer Configuration > Windows Settings > Security Settings > Local Policies > Security Options.
Step 3: Change the Policy Setting
To allow Microsoft account sign-ins on Windows 10, change the policy setting to “Users can add Microsoft accounts.” Click the radio button next to this option and then click the “OK” button to save the changes.
Step 4: Verify the Policy Has Been Applied
Once you have saved the policy setting, restart your computer. After it restarts, try signing in with a Microsoft account. If everything is configured correctly, you should be able to sign in without any issues.
Conclusion
Blocking and allowing Microsoft account sign-ins on Windows 10 can be useful in scenarios where you need to control user access to your computer. By following the steps outlined in this article, you can easily configure Windows 10 to suit your specific needs.


