How to Add the Quick Launch Toolbar in Windows 10

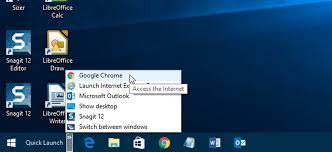
The Quick Launch Toolbar is a useful feature that was first introduced in Windows XP. It allows you to access frequently used applications and shortcuts with just a single click. However, in Windows 10, Microsoft has removed the Quick Launch Toolbar by default. In this article, we’ll show you how to bring back the Quick Launch Toolbar to your Windows 10 desktop.
Step 1: Creating a new folder
The first step is to create a new folder on your desktop. This folder will be used to hold all the shortcuts that you want to include in your Quick Launch Toolbar.
Right-click your desktop and select New > Folder. Give the folder a name such as Quick Launch and press Enter.
Step 2: Adding shortcuts to the folder
The next step is to add shortcuts to the Quick Launch folder. To do this, follow these steps:
1. Right-click the application or file that you want to add to Quick Launch and select Create shortcut.
2. Drag and drop the shortcut into the Quick Launch folder.
Repeat this process for all the applications and files that you want to include in your Quick Launch Toolbar.
Step 3: Enabling the Quick Launch toolbar
Once you have created the Quick Launch folder and added shortcuts to it, it’s time to enable the Quick Launch
Toolbar on your desktop. Here’s how to do it:
1. Right-click on an empty space on the taskbar and select Toolbars > New Toolbar from the context menu.
2. In the New Toolbar window, navigate to the Quick Launch folder that you created earlier and select it.
3. Click on the Select Folder button to confirm your selection.
Step 4: Resizing the Quick Launch Toolbar
By default, the Quick Launch Toolbar may be too small to fit all the shortcuts you have added to it. You can resize it by following these steps:
1. Right-click on an empty space on the Quick Launch Toolbar and uncheck the option “Show text” and “Show title”.
2. Click and drag the edge of the toolbar to make it wider.
Step 5: Customizing the Quick Launch Toolbar
The Quick Launch Toolbar can be customized to better suit your needs. Some of the things you can do include:
• Rearrange shortcuts – drag and drop shortcuts to move them around.
• Rename shortcuts – right-click on a shortcut and select Rename.
• Remove shortcuts – right-click on a shortcut and select Delete.
Conclusion
The Quick Launch Toolbar is a great way to access frequently used applications and files with just a single click. By following the steps outlined in this article, you can easily add the Quick Launch Toolbar to your Windows 10 desktop and customize it to your liking.


