Everything You Need to Know About Jump Lists in Windows 10

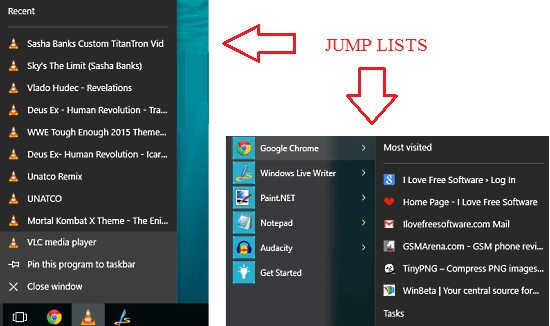
If you are a Windows 10 user, then you might have already heard about jump lists. If you haven’t, then you might be missing out on a great feature that can help you save a lot of time and effort. Windows 10 jump lists are used to quickly access frequently used files, folders or applications. They can be accessed by right-clicking on any icon on the taskbar of your computer’s desktop. In this article, we will explain everything you need to know about jump lists in Windows 10.
What are Jump Lists?
Jump lists are basically a collection of recent files, folders, and applications that you have accessed on your PC. They allow users to easily open their recent files or frequently accessed files without having to navigate through multiple folders on their computer. These lists are also customizable, which means you can pin important files or folders to the list and change the number of items shown in the list.
How do Jump Lists work?
Jump Lists work by automatically tracking the files and folders that you have opened on your computer. When you right-click on an icon on the taskbar, it will show you the recent files and folders that you have accessed using that specific program. For example, if you right-click on the Microsoft Word icon on your taskbar, it will show you a list of the Word documents that you have accessed recently.
How to Access Jump Lists in Windows 10?
Accessing Jump Lists is quite simple, all you have to do is right-click on any icon on your taskbar, and the Jump List will appear. You can access Jump Lists for Windows Explorer, Microsoft Office, Edge, and many other applications. Jump Lists are context-sensitive, which means that they will show you the relevant files and folders based on the program that you have clicked on.
How to Pin Items to Jump Lists?
If you have important files or folders that you frequently use, then you can pin them to your Jump List. Pinning items to the Jump List will make them easier to access, as they will always be at the top of the list. To pin an item to the Jump List, follow these simple steps:
1. Right-click on the file or folder that you want to pin.
2. Click on “Pin to [Program Name]” in the context menu.
3. The item will now be pinned to your Jump List.
How to Customize Jump Lists?
Windows 10 allows you to customize your Jump Lists to suit your needs. You can change the number of items shown in the list, clear the recent items history or turn off Jump Lists altogether. To customize your Jump Lists, follow these simple steps:
1. Click on the “Start” button and go to “Settings”.
2. Click on “Personalization” and then “Start”.
3. Turn the “Show recently opened items in Jump Lists on Start or the taskbar” toggle on or off.
Final Thoughts
Jump Lists are a great feature in Windows 10 that can save you a lot of time and effort. By using Jump Lists, you can quickly access your recent files, folders and applications without having to navigate through multiple folders on your computer. You can also customize your Jump Lists to suit your needs, by pinning important files or folders to the list, changing the number of items shown in the list, clearing recent items history or turning off Jump Lists altogether. So, start using Jump Lists today and make your computing experience even more convenient!


