How to Use Scene Cut Detection in DaVinci Resolve
As a video editor, one of the most time-consuming tasks can be going through and manually cutting each scene of your footage. That’s where Scene Cut Detection in DaVinci Resolve comes in handy. This feature automatically detect cuts in your footage and adds markers for easy editing. In this article, we will go over how to use Scene Cut Detection in DaVinci Resolve.
Step 1: Import your footage
The first step is to import your footage into DaVinci Resolve. You can do this by clicking on the Media tab and then clicking Import. Navigate to the folder containing your footage and select all the clips you want to import.
Step 2: Create a Timeline
Once your footage is imported, you need to create a timeline to start editing. Click on the Edit tab and then click on the New Timeline button. Give your timeline a name and set the resolution and frame rate according to your footage.
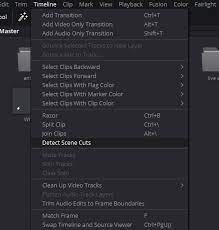
Step 3: Enable Scene Cut Detection
With your timeline created, go to the toolbar at the bottom of the screen and click on the Cut Detection button, which looks like a scissors. This will open the Scene Cut Detection settings.
Step 4: Adjust the Detection Settings
In the Scene Cut Detection settings, adjust the detection settings to your preference. The default settings work well for most footage, but you can change the sensitivity, threshold, and minimum duration to fine-tune the detection.
Step 5: Analyze your Footage
Once you have adjusted the detection settings, click on the Analyze button to analyze your footage for cuts. This may take a few minutes depending on the amount of footage you have, but you can continue working on other parts of your project while it analyzes.
Step 6: Review and Adjust Markers
Once the analysis is complete, you will see markers on your timeline indicating the detected cuts. Go through your footage and review the markers to ensure they are accurate. You can adjust the markers by dragging them left or right to fine-tune the cut.
Step 7: Separate the Clips
Once you are satisfied with the cut markers, you can separate the clips by right-clicking on the markers and selecting “Create Timeline Clips”. This will create separate clips for each scene, making it easier to edit.
In conclusion, Scene Cut Detection in DaVinci Resolve is a powerful tool that can save a lot of time when editing your footage. By following these simple steps, you can quickly and accurately detect cuts in your footage and separate them into individual clips.