How to Use a Multimeter to Measure Current

A multimeter is a versatile instrument that can measure various electrical properties such as voltage, resistance, and current. In this article, we will focus on how to use a multimeter to measure current.
But first, let’s understand what current is. Current or electric current is the flow of electric charge in a circuit. It is measured in amperes or amps. The current can be either AC or DC, depending on the type of circuit.
To measure current using a multimeter, follow these steps:
Step 1: Determine the type of current you are measuring
As mentioned earlier, current can be AC or DC. Check the circuit to see what type of current is flowing before proceeding. If it is a DC circuit, select DC current mode on the multimeter. If it is an AC circuit, select AC current mode.
Step 2: Set the multimeter to current mode
The next step is to set the multimeter to current mode. Turn on the multimeter and select the current mode by rotating the dial to the appropriate setting. On most multimeters, it is indicated by the symbol “A” with a straight line.
Step 3: Connect the multimeter in series with the circuit
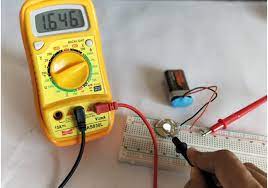
To measure the current, the multimeter has to be connected in series with the circuit. This means that you will have to break the circuit and connect the multimeter between the two ends of the break. There are two ways to do this. You can either use the multimeter’s built-in amp meter or use an external amp meter.
For the built-in amp meter:
– Switch off the circuit and break the connection at the point where you want to measure the current.
– Connect the red probe of the multimeter to the positive end of the break.
– Connect the black probe of the multimeter to the negative end of the break.
– Switch on the circuit and take the reading.
For the external amp meter:
– Switch off the circuit and break the connection at the point where you want to measure the current.
– Connect the red probe of the multimeter to the input jack of the meter.
– Connect the black probe of the multimeter to the output jack of the meter.
– Connect the meter in series with the circuit at the break point.
– Switch on the circuit and take the reading.
Step 4: Take the reading
Once the multimeter is connected in series with the circuit, turn on the circuit and take the reading. The reading will be displayed in amps or milliamps, depending on the range you have set.
Step 5: Interpret the reading
Interpreting the reading depends on the circuit’s requirements. For example, if the circuit requires a current of 2 amps, and you measure a current of 1 amp, then the circuit is not working correctly. On the other hand, if the circuit requires a current of 1 amp, and you measure a current of 2 amps, then the circuit might be overloaded.
Conclusion
Measuring current using a multimeter is a simple process. However, it requires breaking the circuit to connect the multimeter in series, which can be tricky for some circuits. Always read the multimeter’s manual and follow the instructions carefully to avoid any damage or harm. Happy measuring!


