How to Reset Network Settings on a Mac

If you’re experiencing issues with your Mac’s internet connectivity, chances are the problem may lie with your network settings. In such cases, resetting your network settings can often help resolve the issue. This article will guide you through the steps of resetting network settings on a Mac.
Before resetting your network settings, it is important to note that doing so will erase all your current network settings, including wireless network passwords, DNS settings, and DNS cache. Therefore, make sure you have a backup of your important network settings before proceeding with the reset.
Step 1: Open “System Preferences”
Click on the Apple logo on the top left corner of your Mac screen and select “System Preferences.”
Step 2: Open “Network”
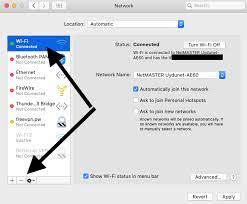
In the “System Preferences” window, locate and click on the “Network” icon. This will display a list of all the active network connections on your Mac.
Step 3: Choose Network Connection
Choose the network connection that you want to reset by clicking it. For example, Ethernet or Wi-Fi.
Step 4: Click “Advanced”
Once you select the network connection you want to reset, click on the “Advanced” button at the bottom right corner of the window.
Step 5: Select “Reset”
After clicking “Advanced,” a new window will open. In this window, click on the “Reset” button, located at the bottom of the screen.
Step 6: Confirm Reset
A confirmation dialog box will appear asking if you’re sure you want to reset your network settings. Click the “Reset” button to proceed with the reset. Your Mac will now reset your network settings for the selected network connection.
Step 7: Reconnect to Networks
Once the reset process is complete, you’ll need to reconnect to your Wi-Fi network again. To do this, return to the “Network” window in “System Preferences” and choose the Wi-Fi network you want to connect to. Enter the password if required.
And that’s it! By following these simple steps, you can quickly reset your network settings on your Mac in just a few clicks. This should help you troubleshoot connectivity issues, and restore stable internet connectivity once again.


