How to Overclock Your Graphics Card

Overclocking your graphics card can lead to improved performance, rendering capabilities, and provide a smoother overall experience for gaming and animation enthusiasts. However, this optimization process may seem daunting to beginners. In this article, we will guide you through the steps to overclock your graphics card safely and reap the benefits of optimized system performance.
1. Assess your current hardware performance:
Before starting the overclocking process, it’s essential to understand your system’s current performance. You can use benchmarking software like 3DMark or Unigine Heaven to get a baseline result for your graphics card’s capabilities. Record this data for comparison after you have overclocked your GPU.
2. Gear up with the required tools:
You’ll need software programs to monitor the GPU temperature, fan speed, and clock speeds throughout the overclocking process. Popular software options include:
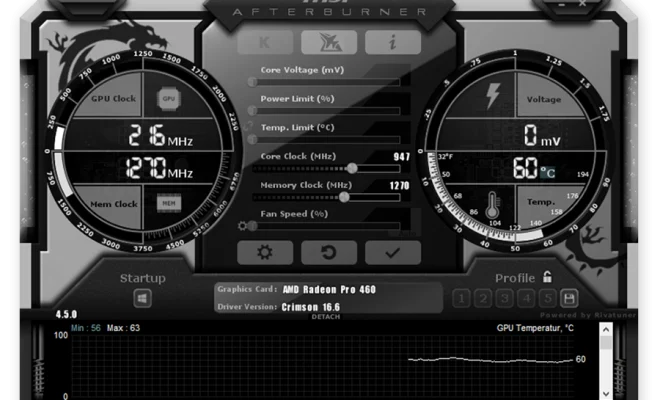
– MSI Afterburner: A widely used tool that provides real-time monitoring of your GPU’s temperature, voltage, power consumption, and fan speed.
– EVGA Precision X1: Another highly-rated tool that offers detailed information about your graphics card’s performance and allows you to customize its settings.
3. Backup and update:
Create a backup of your system with all essential files before you begin, just in case something goes wrong during the overclocking process. Additionally, update your graphics card drivers and BIOS version for optimal support.
4. Increase GPU clock speed:
Open the overclocking software you chose earlier (either MSI Afterburner or EVGA Precision X1) and look for a slider or option that represents the GPU clock speed (typically labeled “Core Clock”). Begin by increasing this value in small increments (e.g., 10-25MHz) to ensure stability.
5. Test for stability:
After adjusting the core clock speed, run a stability test using benchmarking utilities like 3DMark or Unigine Heaven to confirm the system can handle the increased speed. Monitor the GPU temperature during this process; an acceptable range is around 60-70°C. If your system crashes or you spot graphic artifacts, reduce the core clock speed by small increments until you achieve stable results.
6. Tweak memory clock speed:
Next, increase the memory clock speed (often labeled “Memory Clock”). Follow a similar approach as before, increasing in small increments followed by stability testing. Keep an eye on temperatures and look for any graphical issues.
7. Fine-tune voltage and fan settings:
When reaching significantly higher clock speeds, you might need to consider adjusting the voltage supply for your graphics card. A moderate increase in voltage can provide better stabilization at higher speeds but be cautious as this may lead to higher heat generation.
Ensure your GPU stays within the recommended temperature range by adjusting its fan speed manually or enabling automatic fan control within your overclocking software.
8. Repeat testing and record results:
As you finalize your settings, continue running stability tests and recording temperatures. Compare these new results with the baseline performance gathered earlier to evaluate how much improvement has occurred after overclocking.
9. Keep regular check-ups:
Overclocking can lead to additional wear and tear on your hardware, so it’s wise to perform frequent monitoring of temperatures and run occasional benchmarks to assess consistency in performance levels.
With these steps at hand, you can confidently improve your graphics card performance via overclocking and enjoy smoother gaming experiences and increased animation capabilities. Remember that GPUs have varying degrees of potential improvement, so aim for a safe and effective balance between speed, voltage adjustments, and temperature maintenance.


