How to Install Brushes in Procreate

Procreate is one of the best mobile digital painting and illustration apps available on the market today. It’s an incredibly feature-rich app that allows users to create stunning works of art with ease. One of the most useful features of Procreate is the ability to install custom brushes. Brushes are critical tools that allow a user to create different styles and textures, and Procreate has a vast online community with thousands of custom brushes available to download. In this article, we’ll look at how to install brushes in Procreate, step by step.
Step 1: Downloading Brushes
First, you need to download the brushes you want to use in Procreate. You can get them from various online sources such as Gumroad, Creative Market, and even from other Procreate users on social media. Ensure that you download the brush set files in .brushset format, which is the native file format for Procreate brushes.
Step 2: Importing Brushes to Procreate
After downloading the brushes, you need to import them into Procreate. It’s a straightforward process. You can do it either using the app’s built-in functionality or through your device’s Files app.
Here are the steps to import brushes using the app’s import feature:
1. Open Procreate and tap on the “+” icon located at the top-right corner of the screen. This will open the “Create a New Canvas” page.
2. From here, tap on the “Import” option located at the top of the page.
3. When you tap on “Import,” it will open a file browser. Locate the downloaded brush set file, and select it. This will automatically import the brushes into Procreate.
Alternatively, you can use the Files app on your device to import brushes:
1. Open the Files app on your device.
2. Locate the downloaded brush set file and tap on it.
3. Tap on the “Share” button located at the bottom-left corner of the screen.
4. In the share menu, scroll down and find “Copy to Procreate.” If you can’t see it, swipe left and tap on the “More” button, then toggle on the “Copy to Procreate” option.
5. When you tap on “Copy to Procreate,” it will automatically import the brushes into Procreate.
Step 3: Organizing and Using Brushes in Procreate
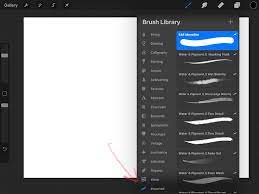
Once you’ve imported the brushes into Procreate, you need to organize them. Tap on the “Brushes” icon located at the top-left corner of the screen. This will open the brush library panel. Scroll down to the bottom of the panel, and you should see a section labeled “Imported.” This is where your newly imported brushes will be placed. You can organize your brushes into folders by dragging and dropping them.
To use the new brushes, select the brush tool from the toolbar, and tap on the brush thumbnail in the Brush Library. This will open the brush settings panel, where you can adjust the brush’s size, opacity, and other parameters. You can also customize the brush by tweaking the settings to match your style and preferences.
Conclusion
Installing brushes in Procreate is a straightforward process that enables you to unleash your creativity and create amazing artworks. With so many amazing brushes available online, you can experiment with different styles, textures, and effects. To install brushes in Procreate, you need to download the brush set files in .brushset format from various online sources, import them into Procreate, organize them into folders, and use them in your artworks. So, go ahead and try out some new brushes today, and see what kind of magic you can create!


