How to Enable or Disable the Windows Taskbar Settings

The Windows Taskbar is one of the most important components of the operating system. It provides quick access to frequently used applications, shows running programs, and displays the system clock and notification area for various apps. Windows allows users to customize the Taskbar to fit their preferences and work habits. In this article, we will guide you on how to enable or disable the Windows Taskbar settings.
Enable the Taskbar Settings:
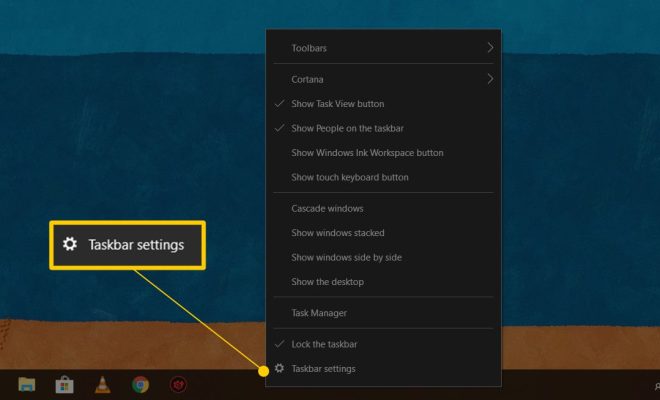
Step 1: Right-click on the Taskbar.
Step 2: Select the ‘Taskbar Settings’ option from the context menu.
Step 3: The Taskbar settings window will open, showing various customization options.
Step 4: You can make the necessary changes such as choosing to display or hide the Taskbar, changing its position or alignment, and disabling or enabling the Cortana icon.
Step 5: Once you’ve made the changes, close the Taskbar settings window, and the new settings will take effect immediately.
Disable the Taskbar Settings:
Step 1: Open the Group Policy Editor by pressing Win + R, typing ‘gpedit.msc’ in the Run dialog box, and hitting Enter.
Step 2: Navigate to User Configuration > Administrative Templates > Start Menu and Taskbar.
Step 3: Double-click the ‘Lock all taskbar settings’ entry.
Step 4: Select the ‘Enabled’ option.
Step 5: Click on ‘Apply’ and ‘OK’ to save the changes.
Step 6: The Taskbar settings will now be locked, and users will not be able to make changes or customize the Taskbar unless they have access to the Group Policy Editor.
Conclusion:
The Taskbar is an essential part of the Windows operating system, and the ability to customize it is a great feature for users who want to make their desktop experience more efficient and convenient. With the above steps, users can easily enable or disable Taskbar settings based on their needs. By following these simple procedures, you can take advantage of the full capabilities of the Taskbar in Windows.


