How to Create and Use a Facebook Avatar

In late 2019, Facebook launched a new feature called “Facebook Avatar”. This feature allows users to create a personalized avatar of themselves and use it as an emoji in the comments section, messenger, and even as a profile picture. If you still don’t have a Facebook avatar, this article will guide you through the simple process of creating and using it.
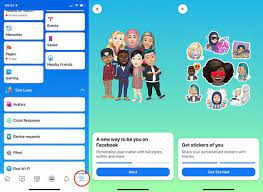
Step 1: Open the Facebook app and tap on the hamburger icon (three horizontal lines) on the lower right-hand corner of the screen.
Step 2: Scroll down and select “See More”.
Step 3: Select “Avatars” from the list of options.
Step 4: Click “Get Started” to begin creating your avatar. You can choose between various hairstyles, skin colors, eye color, and other features, so your avatar can be as unique as you want it to be.
Step 5: Once you’ve customized your avatar, tap on “Done” in the upper right-hand corner of the screen.
Step 6: Congratulations! You have successfully created your Facebook avatar.
Now that you have a Facebook Avatar, here are some ways to use it on the app:
1. Use it as a Profile Picture: You can use your avatar as your profile picture by tapping on the avatar and selecting “Set as Profile Picture”.
2. Use it in Comments: When you comment on a post on Facebook, you’ll see the option to use an avatar in the text box. Simply tap on the smiley face and select your avatar to add it to the comment.
3. Use it in Messenger: When you’re in Messenger, there will be a smiley face icon next to the text box. You can use your avatar as a reaction to messages, or you can send it as a sticker.
It’s easy to create and use your Facebook Avatar, but you have to first make sure that the feature is available in your country. If it’s not available, you might not see the option in the Facebook app. If you’ve already created your Facebook avatar, it’s time to show it off and have some fun with it.


