How to Change the Trusted Phone Number for Your Apple ID

Changing the trusted phone number associated with your Apple ID is important if you want to ensure the safety and privacy of your Apple account. With the increase in cyber attacks and the use of personal information for fraudulent activities, it is crucial that you regularly update your trusted phone number to prevent unauthorized access to your Apple ID account. If you’re wondering how to change the trusted phone number associated with your Apple ID, then follow the steps outlined below.
Step 1: Open your Apple ID Account Page
The first step towards changing the trusted phone number for your Apple ID is to access your Apple ID account page. To do this, open the web browser on your computer or smartphone and type in appleid.apple.com. You’ll be asked to enter your Apple ID credentials to log in to your account page.
Step 2: Navigate to Security Settings
Once you’re logged in to your Apple ID account, navigate to the “Security” section of your account page. You’ll find this option located in the left-hand sidebar menu.
Step 3: Edit the Trusted Phone Number
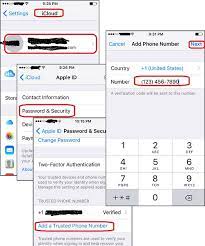
Scroll down to the “Two-Step Verification” or “Two-Factor Authentication” section and click “Edit” to change the trusted phone number associated with your account. If you have Two-Step Verification enabled, you will need to answer some security questions to proceed.
Step 4: Select “Add a Trusted Phone Number”
Under the “Trusted Phone Numbers” section, you’ll see your current trusted phone numbers listed. Click on “Add a Trusted Phone Number” to add a new phone number.
Step 5: Enter Your New Phone Number
Enter the new phone number you want to use as your trusted number. You can enter the number manually or choose to receive a verification code to verify the number. Once you’ve entered your new number, click on “Continue”.
Step 6: Verify Your New Phone Number
Depending on whether you opted to receive a verification code, Apple will either send you a code to your new number or ask you to enter the code they sent you. Follow the instructions provided, and once you’ve verified your new number, it will be added to your list of trusted numbers.
Step 7: Remove the Old Phone Number
To ensure that only the new phone number can be used to verify your identity, you should remove the old phone number from the trusted numbers list. Click “Edit”, and beside the old phone number, click “Remove”.
In conclusion, changing the trusted phone number for your Apple ID account is a straightforward process that ensures the safety and security of your account. Follow the above steps to add a new phone number and remove the old one, and you’ll have peace of mind knowing that your account is well-protected from unauthorized access.


