How to Add a Printer in Windows 11

Adding a printer to your Windows 11 device is a straightforward process. Whether you want to connect a wireless or a wired printer, Windows 11 makes it easy for you to do it by following a few simple steps.
Here is a step-by-step guide on how to add a printer in Windows 11:
Step 1: Turn on the printer and connect it to your computer.
Make sure your printer is turned on and that it is connected to your computer either through a USB cable, Ethernet cable, or over a Wi-Fi network.
Step 2: Open the settings app in Windows 11
Click on the Windows logo on your taskbar to open the start menu. Then, click on the gear icon to open the settings app.
Step 3: Click on “Devices” in the settings app
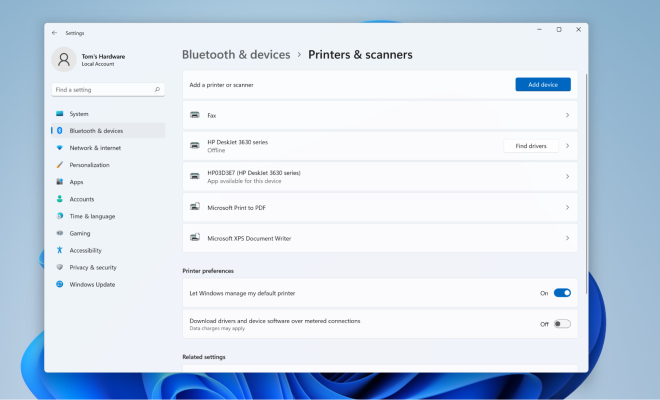
In the settings app, select “Devices” from the menu on the left, then click on “Printers and scanners”.
Step 4: Add a Printer
Click on “Add a printer or scanner.” Windows 11 will start searching for available printers. If your printer is not found, click the “The printer that I want isn’t listed” button.
Step 5: Select a printer
Select your printer from the list of available printers, or click “Add a Bluetooth, wireless, or network discoverable printer.”
Step 6: Complete the process
Follow the on-screen instructions to complete the installation process. If prompted, download and install any printer software or drivers that are required to use your printer.
Congratulations, you have successfully added a printer to your Windows 11 device. You can now proceed to print documents, photos, and anything else you need directly from your computer.
In conclusion, adding a printer to your Windows 11 device is a straightforward process that can be completed in just a few simple steps. Whether you prefer a wired or wireless connection, Windows 11 makes it easy for you to connect and use your printer.


